2005-2016 Hilux Vigo snorkel installation guide
Snorkel Fitment Instructions on a Vigo shape Hilux |
|
This is a metal disc called Eina – By Ian Fraser and here is it’s story; I bought one of Pieter’s snorkels last year for my 3.0 D-4D but only got round to fitting it last week. I must say Heinrich’s thread viewtopic.php?f=94&t=14312&hilit=fitting+snorkel gave me the motivation to go ahead, bearing in mind the dreaded trauma of drilling a large hole into this fender; I didn’t have a big enough holesaw so I bought a 98mm saw at Builders Warehouse and of course I had to buy the appropriate mandrel. I also got some loctite which I used for the threaded allen key type inserts to screw into the snorkel body. All the Snorkel parts are shown here. The inserts are in place and their lock nuts loosely screwed on Attachment:
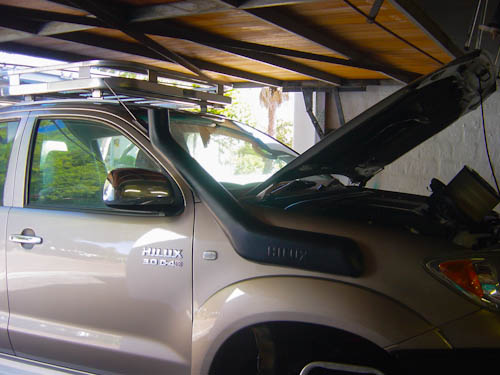
Using Heinrich’s thread as my instruction manual I got to work. First step was to remove the cover above the wheel. I got the first five retaining grommets out and then started struggling to remove the rest. Here’s what the grommet looks like; When I graunched the next one I stopped. Next day I spoke to a friend in the panel beating business and he told me standard procedure is to buy enough spare grommets and just destroy those that are difficult. So I bought some grommets at about R7 a piece and problem solved. Here is the S pipe that fits between the snorkel and the air filter The space inside the fender seemed a bit tight and I wanted to be certain it would fit so I stopped again. Later I PM’d Heinrich explaining my problem and he responded a few hours later and said to give him a call in the morning. What a gentleman. Thanks Heinrich. After chatting to him the next morning I was now confident enough to go ahead. The trick was to remove the air filter housing completely, and then one can see where the S pipe comes into the engine compartment and here is the throw away piece that was attached to the air filter inlet inside the fender and this is how the S pipe will fit onto the air filter inlet I was now comfortable that the S pipe would fit and taped on the template as far forward as possible (see Heinrich’s thread) whilst maintaining the template on the indicator light. Note the gap between the front of the light cover and the template. Attachment:
I was happy that the centre of the large hole would line up with the S pipe inlet. I drilled a pilot hole with a 1.5mm HSS bit and measured some more. After all, one can still fix a little hole, right? EINA! Now, for the next 6 holes. The guys who have already done this are right, the template hole marks are not correct. I found that the one at 10 o’clock did match and the one at 8 o’clock nearly did but the others didn’t so, as advised by others, I put a tiny bit of blue tack covered with black ink on the bolt heads and pressed the snorkel into the large hole to mark the centres. After drilling each hole I redid the marking process just be sure. To be honest, I still had to file some holes slightly larger for the snorkel to fit. Here is the bracket that has to be fixed to the A frame pillar I decided not to use the supplied rivets and instead go with rivnuts and black button head allen key type bolts. So I marked the top hole with the snorkel in place and drilled a 7mm hole for a no. 6 rivnut to fit. I treated the hole with primer and then duco before putting in the rivnut. I then bolted the bracket on to use as a template for the other two holes just to be sure. These were drilled with a 5mm bit and then enlarged to 7mm.
Now it was time to prepare for painting the holes for rust prevention. Primer and Duco After that the last two rivnuts were put in and the snorkel bolted on. Loads of silicon was used around anywhere that water or dust could ingress. Finally, put the air filter back, put the fender cover back in place and fit the snorkel head and we were done.
Buy yours at http://www.4x4direct.co.za/ |

4x4Direct South Africa