Battery Box
Battery box
Who knew these two words could lead to SO many questions. And here is the next episode of the electrickery thread –
http://www.4x4community.co.za/forum/…ry-for-camping
The original posts concentrated (unintentionally) on a camper setup with a battery built into the vehicle. There are however many people out there for whom their holiday vehicle is also a daily driver and they need a mobile solution.
Nothing new about this, afterall, National Luna (NL) have been selling battery boxes for decades.
But technology moves on. People’s expectations, requirements and demands move on.
So what is a “battery box” ? Well, a bit more than a plastic box to hold a battery ….. Here are some of the things that your ideal battery box may include :
– The box
– Something to charge the battery with …. Now here is a topic in its own right !
– How do you get the power to this box
– Some sort of “distribution box” (DB) so that you have save access to the power
– Oooo … and don’t forget, a battery
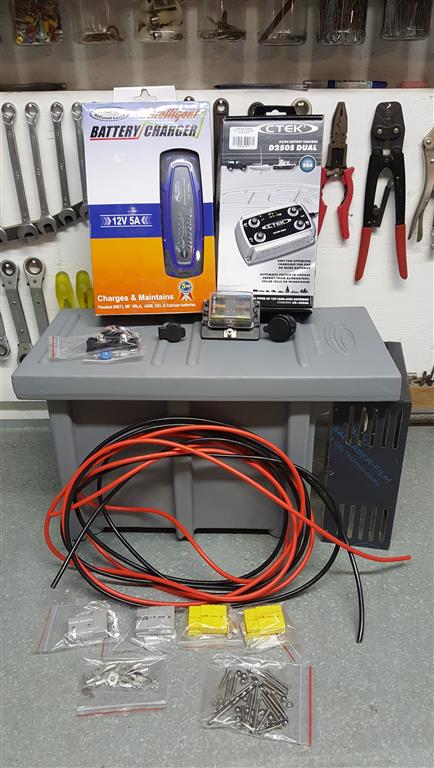
– And lots of wire, lugs, shrink wrap, etc etc ….
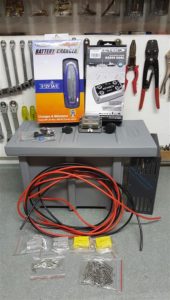
And before long you have a table full of “bits” –
So where do you start with a project like this ? As with all projects, break it down to its core bits and deal with each “bit”, and the pieces of the puzzle comes together. For the sake of the clarity I will explain the process from the “front”.
This project was based on a SUV, with the battery and fridge inside the vehicle. Thus we needed to get the power from the alternator to the inside of the back of the vehicle. We used 10mm2 wire from the front to the back. (as this follows on from the original electrickery posts I wont be going into the detail of why specific thicknesses were chosen)
We started with a 50A NL fuse at the battery in the engine bay. This cable was to supply a dc-2-dc charger with a 20A limit, thus a 30A fuse would have been sufficient but the smallest NL we could get was 50A. IF you want to power devices directly from this line, you would have to check the fuse rating and the cable thickness based on your use.
For a bakkie it is common practice to run the cables underneath the vehicle to get to the back – exposing the cables to physical damage. With the SUV we opted to enter the vehicle at the fire wall, just behind the cubbie-hole. Nice big grommet here, handy to get cables into the vehicle. Dolf, the SUV owner, was a bit surprized to see just how easy the plastic panels along the door lines can be removed – it merely clips out. (just be carefull to not bend a clip and then brake it when you put the panel back). It takes a few minutes to run the cables along the door sills to the back.
We opted to end with a Brad Harison (BH) in the boot space. And here is another area where the technology, and availability of components, has improved since the original thread. Today we have easy access to at least four different BH plugs, ie Grey, Blue, Red and Yellow. They all look the same, and have the same physical dimensions. BUT, the inner space between the + and – have different ridges, thus they are used “per colour”. So you can now have one colour for your PV panel’s plugs, another for your main power line, another colour for your compressor if you so wish. It IS recommended to at least use different colours for the PV and 12V circuits.
Power in the back, time to start with the battery box.
For the box we went with the traditional NL style grey box – http://www.4x4direct.co.za/battery-b…-box-only.html
NOTE – NL has sold many thousands of these battery boxes. BUT, even the best sealed batteries still state in their fine print that a battery should not be housed in a “sealed area”. It is up to you to decide if you want to drill a couple of ventilation holes in the box …..
We also opted for the battery bracket – http://www.4x4direct.co.za/battery-b…y-bracket.html
Dont kid yourself ! The battery has about 10mm side play and about 25mm length play, AND enough head room …. I would not want a battery standing loose with that amount of free play when driving on Kgalagadi’s roads ! The wing-nuts are useless though inside the confines of the box, we swopped it out with normal nuts.
You could go for the more traditional plastic electrical DB box –
http://www.4x4direct.co.za/battery-b…52mmx79mm.html
4x4Direct has a nice stainless steel “face plate insert”, and we went this route – http://www.4x4direct.co.za/battery-b…-luna-box.html
Please note this face plate is meant to be used as a DB. We opted to combine both the DB and charging inside this space…. Made for a tight fit, but a nice compact powerful final product !
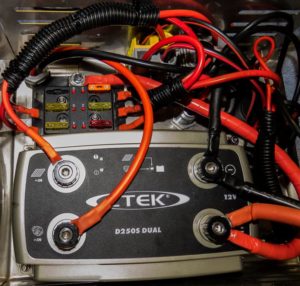
SO, what charger to use? We wanted a DC-2-DC charger. We also wanted to future proof the installation for when Dolf does get a PV panel. And for his trips he NEEDS a unit that will switch automatically between alternator and PV. Thus, this project we went with the trusty old Ctek 250S. (other options will be discussed in a different post).
And this is what the “battery box” looks like –
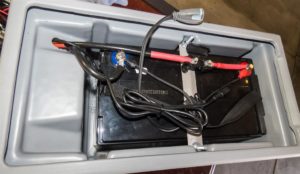
NOTE – Dolf also bought the NL 5A 220V charger to charge and maintain the battery when not touring. The quick connector for this was bolted onto the battery, and left inside the box. – http://www.4x4direct.co.za/home-char…y-charger.html
Think back to the original posts – we now have the following in place :
– Power to the back, with a fuse at the primary battery
– BH to connect the battery box in the back
– Ctek 250 S to take the power from the alternator, and to charge the battery.
So the next step would be a fuse AT the secondary battery before taking the power to the DB box. Inside the DB box the positive wire goes to an integrated fuse box –
http://www.4x4direct.co.za/fuse-hold…indicator.html
From here each circuit can be fed independantly, and fused as per the requirements of that circuit.
NOTE – for an electrical circuit to work you need both a + and – “connection”. For this project we opted to use a bolt where all the negative lugs where terminated. This meant the Ctek was bolted down with three short bolts, and one extra long bolt which served as the negative terminal. The other option is to use a negative buzz-bar.
And here is where it becomes very personal – what is YOUR ideal DB ? What power outputs do YOU want ?
For this installation we opted for the following :
– Dual 2,1A USB charger
– Hella output
– Volt meter, with a switch
– 1x Yellow BH – PV input
– 3x Grey BH output points; ie fridge, compressor, spare; and each fused accordingly!
Inside the battery box we used 16mm2 cable between the battery and the common points. 10mm2 would have done the job, but I had some spare cable. 10mm2 was used to the BH plugs, for the rest we used 6mm2.
The following paragraph was added by Dolf –
I opted for a Betta Lead Crystal battery (positive comments on the forum were taken into account when the choice was made!). Betta claims that these batteries combine all the advantages of long cycle life, high efficiency, low and high temperature resistance and low internal resistance, as well as environmental safety. They can be charged faster, discharged deeper, cycled more often and used in a partial state. It is an expensive battery, but if it lives up to the claims, it would be money well spent.
And this is what 20 hours of labour looks like :
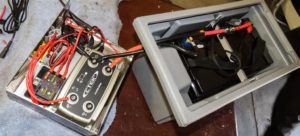
Still some work left to wrap up –
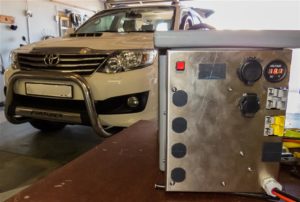
Dolf was going to remove the last bits of plastic at home
Article posted with permission of ChrisF